Leaving Your Things Unattended is No Joke! Memory Bus Snooping and Open Debug Interface Exploit Case Studies
Internet of Things devices are widely adopted by the general population. People today are more connected than ever before. The widespread use and low-cost-driven construction of these devices in a competitive marketplace render Internet-connected devices an easier and attractive target for malicious actors. This paper demonstrates non-invasive physical attacks against IoT devices in two case studies in a tutorial-style format. The study focuses on demonstrating the: i)~exploitation of debug interfaces, often left open after manufacture; and ii)~the exploitation of exposed memory buses. We illustrate that a person could commit such attacks with entry-level knowledge, inexpensive equipment, and limited time.
Appendix for Leaving Your Things Unattended is No Joke! Memory Bus Snooping and Open Debug Interface Exploit Case Studies
Resources
A key resource is a book by reverse engineering expert Edwin Sobey [1]. Sobey talks about salvaging useful components from broken or old electronics in this book. More importantly, readers can study how to use correct tools to dissect the device, identify valuable parts that can be reused, basic knowledge about things they work, and safety rules to follow when unscrewing devices. Notably, this book was published in 2011 and some techniques are outdated with the rapid evolution of industrial designs. For example, nowadays, more and more devices have their casing held together with adhesive or ultrasound welding rather than screws and clips commonly used in 2011. For readers without an electronics background, an introductory book to build and test some simple circuits in Electronics for Beginners written by Jonathan Bartlett [2] is a good starting point. This book covers basic electronics concepts, schematics, circuit analysis and calculations. Given some familiarity with electronics, The IoT Hacker’s Handbook written by Aditya Gupta[3] provides in-depth insights into hardware and embedded system exploitation to firmware exploitation.
Then, www.ifixit.com is a wiki-based website for user-generated content sharing focusing on repairing technological devices. The website provides video content from experienced people with step-by-step recipes to tear down the device. This may largely reduce the risk of having your device damaged or injuring yourself. Another wiki-based website, www.exploitee.rs, focuses on hacking where the content provides information on how to find hidden debug interfaces and how to decrypt dumped firmware from the examples provided therein.
Attacker tools
- Multimeter: An instrument that can measure basic electrical properties, such as voltage, current, resistance, and so on. We recommend choosing a multimeter with diode forward biasing and wire connectivity function. The model we used in this work is a US$33 Stanley STHT77364, an US$10 alternative Gator XL830L from could be an alternative.
- Logic analyzer: An instrument that can measure fast varying digital signals, records those signals over time domain, and performs analysis to discover the information encoded. In this work, we did not use a logic analyzer, in future work we will use a US$300 Digilent Analog Discover 2 to demonstrate the analysis of U-Boot entry point by monitoring the off-chip Flash memory bus traffic. For such kind of task a 24MHZ 8 Channel open-source logic analyzer priced US$15 is adequate.
- Flash memory programmer: A low-cost (US$15) device to read out the Flash (generally also supports EEPROM) memory content from or write image files to Flash memory chips. A model with a test clip for fast and clean hooking up the exposed memory bus is more useful. The CH341A Pro Flash memory programmer used in this work is priced US$10 on ebay.com.
- JTAG programmer/debugger: JTAG is also known as the IEEE 1149.1 standard for deploying and debugging firmware on the chip and also offers low-cost and time-saving testing for all components in a system through boundary-scan. JTAG is widely used in industry. Different system architectures may require different JTAG programmers, the one we used to extract electronic lock programming code from MSP430G2433 is an US$150 MSP-FET430UIF. Compatible MSP430 JTAG programmer from a third party is around US$35. An universal JTAG programmer supports ARM, MIPS and RISC-V also priced at US$35 on ebay.com.
- Embedded system development board: Such as Raspberry Pi Zero (US$10), Arduino UNO R3 (US$22) or STM32 Bluebell (US$15). Those development boards are useful, for example, to deploy JTAGenum (https://github.com/cyphunk/JTAGenum), an open-source program for identifying JTAG pin-out definitions.
Disassembly of The Electronic Lock and IP Camera
To disassemble the electronic lock, a T-10 screwdriver is required to remove the four bolts holding the back panel in place. Subsequently, all internal parts can be removed by hand within 1 minute, without a tool, as illustrated in Fig.8. Our technique to get access to the JTAG pins is to solder a 1.27 mm 7-pin header. This requires 5 minutes. Accessing the internal NVM using MSP-FET430UIF debugger can take another 3 minutes. We can de-solder the jumper wire header in 3 minutes with a hot air gun and take another 3 minutes to put all parts together. The entire process takes 15 minutes and could be further shortened by using a data repair tool (available on www.ebay.com for US$21) instead of soldering a pin header.
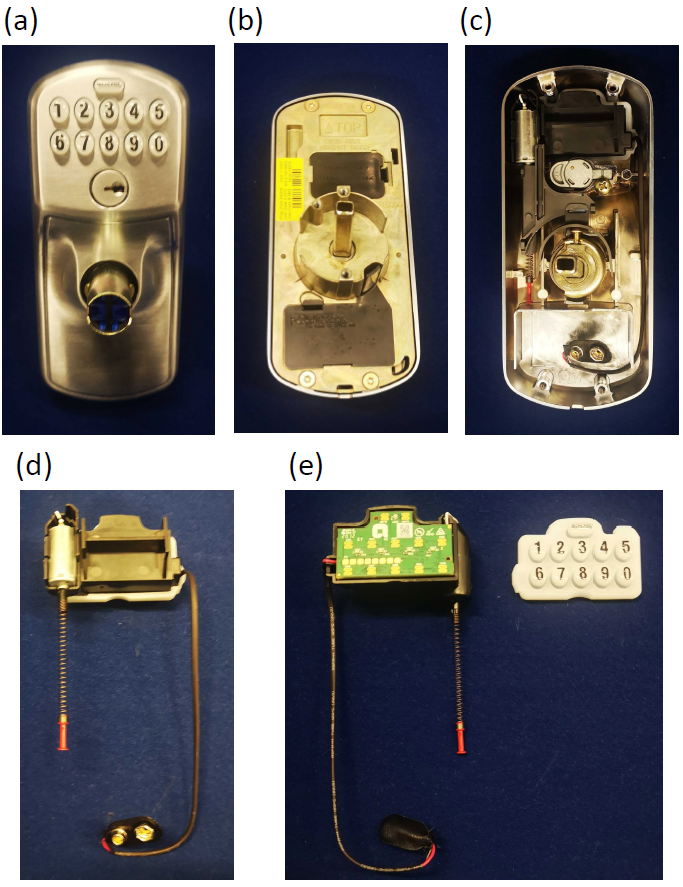
Fig. I Tear-down of the electronic lock: (a) front side; (b) back side; (c) with back panel removed; (d) the electronic assembly; (e) the circuit board is visible after removing waterproof silicone rubber keyboard.
The disassembly of the WiFi IP camera simpler. We can remove the front panel of the camera by inserting a lever into its edge and gently applying a force as shown in Fig.9. Then the mainboard is removed by freeing the snap-fit in less than one minute. It takes tens of seconds to attach the Flash programmer test clip to the exposed Flash chip and short circuit the RESET pin of the SoC. Reading the Flash memory via SPI is the most time-consuming part, taking 3 to 4 minutes. Once the memory image is dumped, the target IP camera is re-assembled in another minute. We conclude the entire process is possible in 8 minutes. The firmware analysis and cracking of the dumped firmware can be done offline, as shown in our demo video https://youtu.be/m7ZcDeiTHVQ.
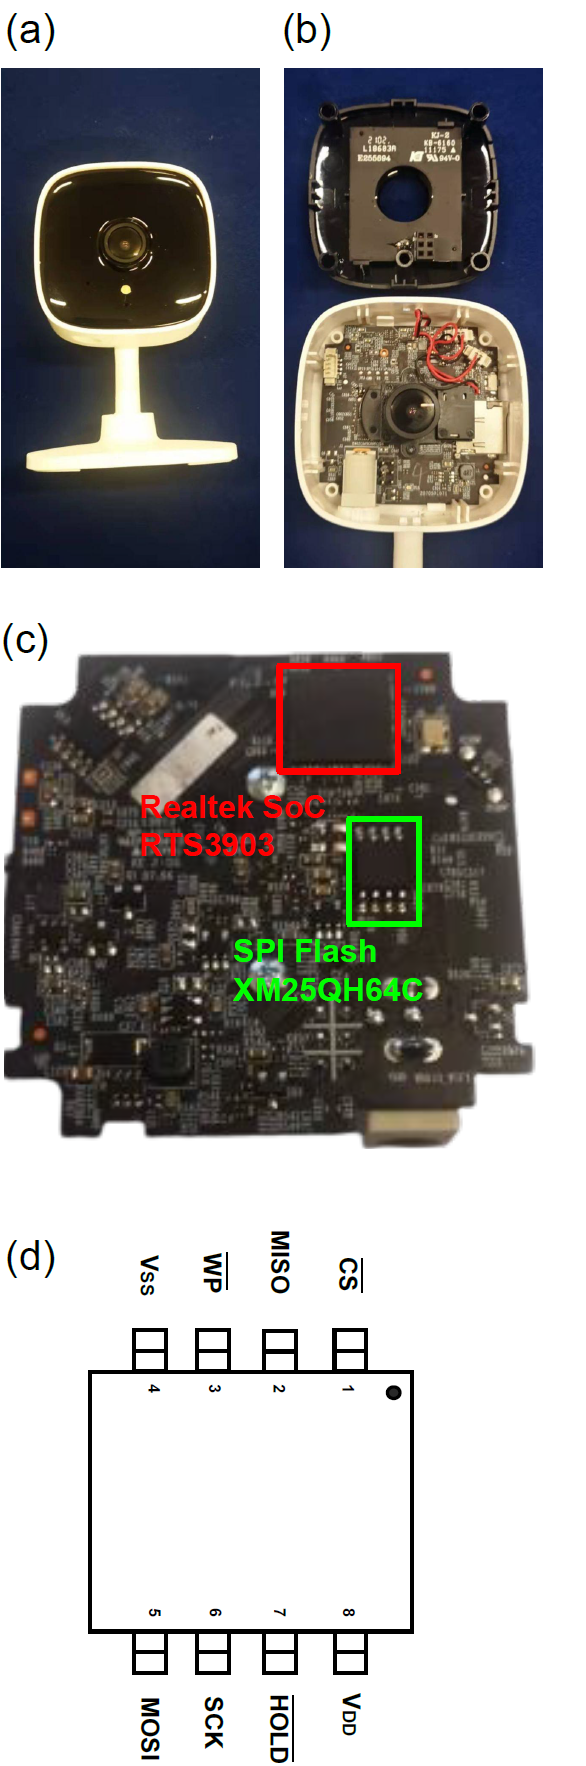
Fig. II (a) the front side of the TP-link Tapo C100 IP camera; (b) with the front panel removed; (c) the back side of the main board; and (d) the pin definition of the MX25QH64 SPI Flash chip.
Demo video
References
[1] Sobey, Ed. Unscrewed: Salvage and Reuse Motors, Gears, Switches, and More from Your Old Electronics, 2011, Chicago Review Press.
[2] Gupta, Aditya. The IoT Hacker’s Handbook: A Practical Guide to Hacking the Internet of Things, 2019, Apress.
[3] Vishwakarma, Gopal and Lee, Wonjun. Exploiting JTAG and its mitigation in IOT: a survey, Future Internet, volume 10, number 12, pages 121, 2018, Multidisciplinary Digital Publishing Institute.